Saturday, 31 October 2015

Knitted Orange and Brown Wrist Warmers

I am very into knitting right now, probably since I got large amounts of yarns for my birthday but also because it is getting colder and soon it will be winter here in Sweden. I found a very nice and simple pattern for these wrist warmers on Drops Design Studio homepage, and you can easily change the language right under the picture to the left in the pattern :)

I will definately save this pattern for the future because it is great for both wrist warmers and ordinary mittens. The thumb increase is easy to understand and the only thing you do differently to use it as a pattern for mittens you don't bind off the stitches for the thumb, just saving them on a piece of yarn for later to make the thumb.

Happy knitting! :)


Monday, 26 October 2015

Ink Drawing Liselotte

The last couple of days I have had thoughts of starting to draw pictures agian. I really love drawing, especially human faces because of all the opportunities faces give, and I looked into my boxes with pencils and other drawing eqipment I have. I bought some Indian ink pencils in beige and brown colors a year ago but somehow I never used them. Today I used them for the veryfirst time and this drawing is my first attempt to make a Indian ink drawing. I made the first contours with ordinary lead pencils and then I just used my feelingshow it should be and colored as I went.

The girl in the picture is my sister in law Liselotte. She has a very unique face with strong details so it was fun to try to make the drawing look like her. I think I nailed some parts but for next time I will try to dare more with the colors around the cheeks and the nose because then I think the similarities with the original will be better :) I am really overwhelmed with these ink pencils and I will keep on using them in the future. For this drawing I only used four pencils: one black marker, and three ink pencils in light sand, dark beige and brown. I will buy some new colors, maybe some grey colors and white to get more possibilities. 


Monday, 19 October 2015

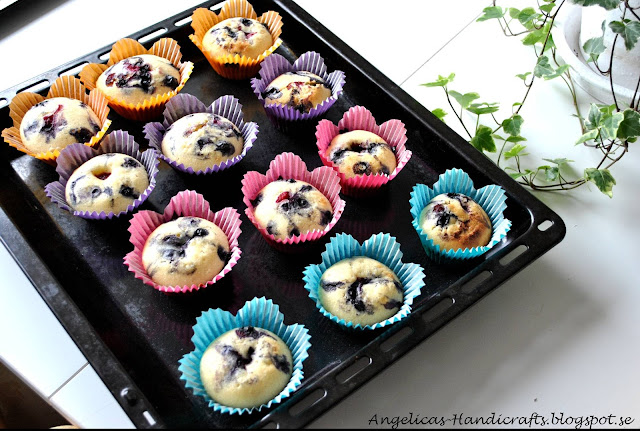
Raspberry and Blueberry Muffins

On a grey Monday afternoon a batch of lovely berry myffins can make the sun shine! 
I found this recipe in the golden "Swedish cakes and Cookies", a Swedish classic baking book. If you would like to buy this book you can find the swedish edition here and the english edition here!

Happy baking!


12 Raspberry and Blueberry Muffins
100 grams of margarine or butter
1 1/2 dl sugar
4 eggs
5 deciliter flour
1 teaspoon baking powder
1 teaspoon vanilla sugar powder
1 deciliter milk
1,5 deciliter frozen berries, I chose raspberry- and blueberry mix

How to...
1. Put the oven to 175 Celcius.
2. Stirr the room temperatured margarine with the sugar until you get a white and homogeneous mixture. 
3. Add one egg at the time and stirr carefully. 
4. Mix bakingpowder, vanilla sugar powder and flour in a bowl.
5. Alternate between adding flour mixture and milk to the margarin/sugar/egg mixture little by little while stirring carefully until you have the final smooth batter.
6. Distribute the batter into the paper baking cups.
7. Use your fingers or a spoon to poke down the berries deep into each cup with batter. Make sure to spread the berries.
8. Bake in the middle of the oven for 15-20 minutes.


Tuesday, 13 October 2015

Blue Knitted Mittens

I took a glance into my basket of yarns and found some unfinished business. A half-finished sad little mitten was hanging around with the yarn balls thinking about if it ever would be a real mitten someday. Actually that mitten has been laying around ever since last winter when I thought it would be nice to knit mittens for my husband for Chrismas. However, I had too little time back then and I decided to give him something else.
Well now the half-finished mitten is finished and so is his brother :)

I combined two patterns for these mittens and that is because I started making a model were every finger is individual but I found that it was too hard for me so I found a pattern with only the individual thumb. Here is the free pattern for mittens with individual fingers and here you find the free pattern for the mittens with only individual thumb.

The yarn I used is acrylic and it has its positive and negative features for sure. The positive features are the strong bright colors that is not very common in cotton yarns or wool, at least not where I live. The negative features are that the garment you make will almost always get uneven on the knitted surface unlike wool or cotton who will stay firm amd smooth.


Sunday, 4 October 2015

Crocheted Wrist Warmers

This weekend I found some really cute wrist warmers to make in the sofa while watching television. I was looking for a easy project and something I could really use.
I am a true beginner when it comes to crocheting so I was very pleased when I found this video tutorial for these wrist warmers on Drops Design Studio's homepage. The video is really easy to follow (no sound, only visual) and you work with both the video and the free pattern at he same time. When you get the hang on the pattern routine you don't have to look so much in the pattern description and it turns out quite fun when the fingers just go with the flow :) Oh, and you can change the pattern language in the menu just below the picture!

Since I had these yarns I really wanted to use (because I love how they shine in the sunlight) the thickness of the yarns doesn't match the thickness recomended in the pattern and the final result of the hand warmers is not very graceful and smooth like the pictures in the pattern. However, I don't really mind, I think that the colors turns the roughness to look quite charming so I am proud to put them on anyway :)

This type of garment is not ideal for my own use because my fingers gets very cold easily. These wrist warmers cover basically the whole hand except the fingers so if it is a bit cold outside it is better for me to use knitted gloves. These wrist warmers will however be good to use between autumn and winter when it is not too warm but not too cold either.   


Wednesday, 2 September 2015

Soft Toy Elephant

As you probably already know by now I like making toys and last month when I found a book about making soft toys I knew I had to start planning for some serious toy making! The book is from the 70's but these models doesn't get out of fashion which is great.

The pattern pieces for these toys were drawn in miniature size on squared paper in the book and I had to do my own squared paper were each square was 2,5 cm *2,5 cm to get the natural size. Then I tried to copy the drawings of all pattern pieces the best I could on my own natural sized squared paper.
It was a new way for me to get the pattern ready, I have only used Burda patterns before and there you don't have to re-size anything or draw by hand, so this was exciting and fun!

I chose the elephant pattern because I thought it was so very cute. I calculated how big the final toy would be and thought it might get too big so I chose to make my squares 1,5 cm instead of 2,5 cm. That resulted in the little elephant you see in the pictures. It was a little tricky to sew and then turn the fabric inside out, especially around the trunk area, so I decided to make one more elephant in the original size which resulted in the big elephant in the pictures. I think they both turned out good and I am pleased with them both. The filling is a white fluffy 100% polyester fuzz, but according to the book small pieces of cloths is good to use too.


Sunday, 23 August 2015

Tosca Cake

One of my grandmother's classic recipes was the tosca cake, a soft spunge cake with a layer of caramelized almonds on top. I remember as a child I found the topping was the goodiest thing so I ate that first :)
I haven't baked this cake before, and I haven't eaten one since my grandmother made it maybe ten years ago, so I experienced a flashback when I took a bite of this :) A good flashback! The almond topping is the best! Try it, you won't be disappointed :)
Tosca Cake
100 grams or magarine or butter
2 eggs
1 1/2 dl sugar
2 dm flour
1 teaspoon baking powder
1/2 deciliter milk

Topping
100 grams of margarine or butter
1 deciliter sugar
2 tablespoons flour
2 tablespoons milk
100 grams chopped sweet almonds (peeled or unpeeled)

1. Put oven to 175 Celsius.
2. Grease and bread a round cake tin with removable rim, aproximately 24 cm in diameter.
3. Melt the margarine/butter and let it cool for a while.
3. Whisk sugar and eggs until the mix is light and fluffy.
4. Add the flour mixed with baking powder, the melted margarine/butter and the milk until you get a smooth fluffy batter.
5. Pour the batter into the cake tin and let the cake bake in the lower part of the oven for about 20 minutes.
6. While the cake is in the oven you can start preparing the topping.
7. Mix all the ingredients into a saucepan and let it warm slowly while you stire carefully.
8. When the mixture has started to thicken it is ready.
9. Spread the topping on the cake.
10. Let the cake bake approximately 15 minutes more in the middle of the oven until the color is nice on the topping.