Showing posts with label Pink. Show all posts

Monday, 30 November 2015

Soft Pink Teddy Bear

It is teddy bear time!
As I was browsing trough my patterns I found this very cute teddy bear, and since I got a lot of fur fabric in different colors from my husband for my birthday I finally found what I was going to do with it (beacuse I wanted to make something really nice). For this bear I chose a pale pink fur fabric and since the fabric was about 1,5 m long I only used about 30 cm width! That means that I have almost 1,5 meter width left ready to be used for something else.
The whole body is one piece, the only separate pieces are the nose and the ears which I have sewn by hand. The instructions were not easy to follow when it came to the nose area since the pictures were very dark and authors used dark brown fabric. In the end I just got a bit frustrated and I made some own decisions and it came out good. I usually is quite impatient with patterns and if I don't understand right away I just do my own thing and hope for the best. However, this time I really pushed myself to understand for a long time but it didn't work out. I think the result is good and I will stick to my own routines if I do more bears of this model. The pattern I found for this bear is coming from the same book I used for the Soft Toy Elephant.

Happy sewing everyone!


Saturday, 15 August 2015

Simple Jersey Tank Top!

Hello! I took a little summer vacation the past two weeks and I am now back on the blog with a very simple and cute sewing idea! Tank tops are one of the most popular garments but even if they often are made of very small amount of fabric they cost quite much. Also, I have the problem that when I need a tank top I seem to be the only one looking for COLOUR because the shops are always full of black, white and grey garments... So, I thought to myself that I probably need to fix the tank top I want by myself. I went to my favourite store in my town, Ohlssons Tyger, and found some lovely jersey fabric. The fabric was actually knitted like a tube and had the perfect diameter for my body so this tank top model didn't need very much sewing!
I bought the fabric in the three colors light pink, yellow and purple so I could make three tank tops. The final cost for these three tank tops is about 160 Swedish crowns (20 USD) together and when I look in the stores I can't find three tank tops in the right colors for less than 300 Swedish crowns (35 USD) together so I think I made a good deal :)

How to...
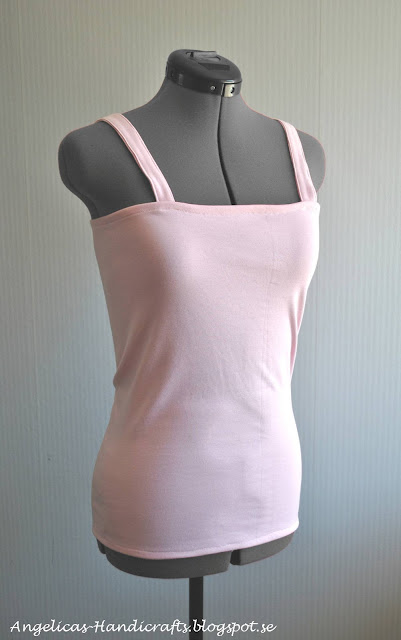
The easiest way to make your own tank top is to take measurements from a tank top you already have and like. Measure the body length and width of the tank top and then transfer them to the new fabric you want to use. If you don't have a tube-knitted fabric like I had, just cut out two rectangles in single sided fabric and sew one seam in each side to make your own "tube".  Remember to add about 0,5 cm on each side as seam allowance before you cut out your rectangles. Make sure to get the rib vertical so the fabric works along your body.

I wanted my tank top to be 45 cm long so I cut it about 50 cm and fold the upper and the lower edges about 2,5 cm each to get the final 45 cm length. The two stripes you see at the right in the picture above, are the two shoulder-straps in double fabric. You can of course make them how wide you like but I made them 3 cm wide and fold the long edges in about 0,5 cm on each side so they became about 2 cm wide in the end.
To get the right length for the shoulder-straps I measured on a tank top I had at home, you can also measure the straps on your bra. 

The piece in the lower part of the picture I used to make a headband to match with the tank top - super cute!

Monday, 13 July 2015

Pink and White Plaid Kilt

For some time now I have had a pink and white plaided fabric I think is very pretty but I didn't know what to make out of it... until last weekend!
When I was in high school (no, we will not think about how many years has past since then...!) I wanted to have my own unique style and luckily I have a mother who is very talented seamstress. One type of garment that became my special feature was all my different kilts I had. When I count in my head how many different kilts I had (I still have them stored in a box somewere) I count to six and all of them were different from eachother in both length and style. I have thought about them now and then but last weekend I decided to try to make one myself. I studied one of my old kilts and tried to make a copy. My old kilt had about 3 cm deep pleats but I decided to make 5 cm deep pleats instead.
I am very pleased with the result and I was actually surprised that I could make it look so good and alike my mothers old kilt model.
I lined the kilt with a thin polyester fabric because when the kilt is so short it has the bad habit of "climbing" up the legs when I walk. I love this style and I will definately make several more kilts in the future. I think it could be my special feature again, I forgot how comfortable this garment is :)


Saturday, 14 March 2015

Lemon Cake with Raspberry/Blueberry Jam and Vanilla Custard

HAPPY BIRTHDAY ANGELICA'S HANDICRAFTS - ONE YEAR HAS PAST!

Oh, I can't believe that the blog turns one year this weekend! It has been a wonderful year and I have blogged about many new projects. This year has made me realized that I actually can finish things and not just start them! As you probably have experienced this year I try to do different projects from week to week so you readers get variation. I hope you have enjoyed the past year's posts and keep coming back and always feel free to give me a comment :) As a birthday present for the blog I have started a Instagram profile today named angelicashandicrafts where I will start posting pictures of projects and other things regarding the blog - I hope we meet there!

For this week I made a birthday cake for my blog, I wanted to make it in many layers and I wanted to make all the parts by myself and not use any semi-manufactures.
The cake contains three layers of filling; two layers of homemade blueberry/raspberry jam and one layer of homemade vanilla custard.


Lemon Cake with Blueberry/Raspberry Jam and Vanilla Custard

Garnish
5 dl whipped cream
Red food coloring
Sprinkles

Homemade bluberry/raspberry jam
250 grams frozen raspberries
250 grams frozen blueberries
1 deciliter sugar
Sheet of gelatin (optional)

1. Let the berries thaw and become soft in a sauce pan on medium heat while stirring. 
2. When the berries are soft you can use a spoon or a masher to crush the berries.
3. Add sugar and let the jam simmer for about 15 minutes.
4. If you want you can add gelatin sheet, follow the instuctions on the package.
5. Put the jam into the fridge to cool completely.

Vanilla Custard
2 deciliter milk
2 tablespoons sugar
2 tablespoons corn starch
2 egg yolks
2 teaspoons vanilla sugar

1. Put all the ingrediets, except for the vanilla sugar, into a sauce pan.
2. Whisk until you get a smooth batter.
3. Heat on low to medium heat while you continue to whisk constantly until the custard is firm and fine in texture. The custarn must not boil!
4. Stir gentley and add the vanilla sugar.
5. Let the custard cool and keep it in he fridge until making the cake.

Lemon Cake (make TWO of this!)
3 eggs
2 deciliter sugar
1 deciliter wheat flour
60 grams potato flour
2 teaspoons baking powder
Juice and grated lemon zest of 1/2 lemon

1. Put the oven on 175 Celsius.
2. Grease and bread a spring form diameter 20 cm.
3. Whisk the eggs and sugar until the batter is light and white.
4. Mix flour, potatoflour and baking powder and then stirr it into the egg batter.
5. Add the lemon juce and the grated lemon zest into the batter. 
6. Pour the batter into the spring form and bake in the loer part of the oven for about 40 minutes (but use a test stick to see when it is dry.
7. Let the cake cool in the form and then take it out and let it rest on a grid.

Assembly the cake
1. If the two lemon cakes are rounded on top, even out with a knife. Cut both cakes in two so you get a total of four cake layers.
2. Put the first cake layer on a cake stad or a plate and spread half of the blueberry/raspberry jam on it.
3. Add the next cake layer and spread all of the vanilla custard on it.
4. Add the next cake layer and add the rest of the blueberry/raspberry jam on it.
5. Add the final cake layer.
6. Whip 5 the cream and add a few drops of red food coloring to make it pink.
7. Use a spatula to spread a layer of pink cream all over the cake.
8. Use a piping bag to make decorations on top and cover the cake with sprinkles!

Tip: I made the jam and the vanilla custard the day before I made the cake - good to divide the various stages and not do everything at once!


Sunday, 6 July 2014

Pink Denim Jacket

This week, the first week of my vacation, I decided to finish my denim jacket I started on about three months ago. Because of other projects, work and laziness I didn't finish it when it only was the lining left to make. I guess that's just the way it is with some projects, some fall between the chairs and you really need to make an extra effort making yourself finish it.
Anyway, it is finally finished and I am quite satisfied. I made one mistake though, by using a rather thick lining fabric. I think a thinner fabric would have made the final result a little less bubbly. Maybe one day when I have the inspiration I will change the lining fabric but right now it feels good. At first I thought this jacket to be a spring/summer jacket but now with the thicker lining I think it is more of a late summer/autumn jacket, which suits me fine :)

I really like the diagonal zip at front. The uneven lower edge at front is also very cool (which I made up by myself as I went - this area looks differend in the pattern). Small details like that makes an ordinary biker jacket a bit cooler and modern - even futuristic.  Here is also a very good example of showing how colors can make big difference. The denim fabric is dark pink on one side and lighter pink on the other side. Instead of making all the parts of the jacket in same dark pink color (the front side of the fabric) I choose some parts to be in a lighter pink color (the backside of the fabric). I think it really make the jacket come alive in a different way than it would have done if all parts were dark pink.


Sunday, 8 June 2014

Pink Party Dress

As I wrote in my previous post, this Saturday I attended my long time friend Maria's wedding. And what a wonderful day it was! She was so lovely in her dress, make-up and hairstyle and the wedding reception was very beautifully arranged by our common friend Emelie who was toast-madame. They had arranged a lot of delicious food and fun entertainment during the dinner.

I wore my self-made glittery little pink dress and the flower decorated diadem I showed you guys in previous post :) The satin shoes is the same I wore at my own wedding last year - wonderful when you get to use so pretty things more than once :)

For this dress I mixed two patterns from Burda Style 12/2013, see the sketches for these two models below.

 My pink dress is made by these two patterns. 
The skirt section  of my dress is same as model 130 and the top section of my dress is same as model 122.  


Pink tulle with sparkles in four layers.


A closer look at the flower-diadem in my hair.  
The crochet cardigan is made by my mother - I think it is a true work of art.

White satin ribbon around waist, at the top edges of the heart shaped upper part, 
at backside and around neck.


Sunday, 1 June 2014

Pretty Pink Textile Flower

For some time I have wanted to make something special to put in my hair but haven't got the right idea. I have to admit that I LOVE hats, and if I had the materials, the tools and the opportunities to wear them, I would definately try to make my own hats.

Next weekend I will attend my long-time friend Maria's wedding and for this special occation I couldn't resist making something fun for my hair. The diadem is the one I wore at my own wedding last year.
For the wedding I will wear a dress I have sewn by myself - it will be reveald in next blogpost :) The only thing I will reveal for you today about the dress is that the fabrics I used in this flower are the same I used for the dress!

Below you will find a little tutorial how to make this flower. Please note that you need to have about 2 dm long ribbon end when all hearts are fixed on the ribbon - otherwise you won't have anything to use to attach the flower on the diadem.


Saturday, 12 April 2014

Cutting out a new pattern

It has been a very nice sunny day today and after shopping food for the upcoming week and some cleaning in the apartment I sat down for some hours to start measuring and cutting out all the pieces of the pattern for my next sewing project - a short jeans jacket in... PINK of course! :)
In the last minute I decided to change my mind regarding the length. The original plan was to make a short coat but today I realized that a short jacket is much more useful for me.  


The scarf knitted in blackberry technique I started working on last week is growing, and next week I hope to reach halfway! :)

Also, yesterday a parcel finally arrived at my doorstep containing an new and exciting accessory I will use in my future photos :) When the scarf is finished this new accessory will be revealed here on the blog!