Showing posts with label recipe. Show all posts

Saturday, 20 February 2016

Nutty Cookies with Hazelnuts and Almonds

Hi everyone!
This cookie is one of my childhood baking things I want to remember. My grandmother on my mother's side baked these cookies, or a cookie close to this cookie, and I imagine it was one of her favourites because they are very easy to bake and also very delicious. And that is also my favourite combination ;) If it was exactly this recipe I don't know but I think they taste like my grandmother's cookies.


Nutty Cookies with hazelnuts and almonds (40 cookies)
100 grams of hazelnuts without the shell
100 grams of almonds
2 deciliter sugar
1 tablespoon potato flour
2 eggs

Garnish
Hazelnuts
100 grams of baking chocolate

How to...
1. Put the oven to 200 Celsius (175 Celsius for convection oven)
2. Grind the nuts in a almond grinder and put them in bowl.
3. Add sugar, potato flour and eggs to the bowl and stirr it all together until you get a firm batter.
4. Use your fingers to portion out small balls on baking plates (use baking paper or grease the pan!)
5. Push one hazelnut in the middle of each ball, if the almonds are very big you can divide them in two.
6. Bake in the middle of the oven for about 8 minutes.
7. The cookies are easily getting stuck on the paper so remove them from the paper before they cool.
8. Tempering 50 grams of baking chocolate over water bath (melt and heat to 45 Celsius, add the rest of the chocolate and let it cool to 25 Celsius, then heat it to 30 Celsius - done!)
9. Dip the bottom of the cookies into the chocolate and lay them with the up side down to solidify.


Happy baking everyone! :)
 

Monday, 19 October 2015

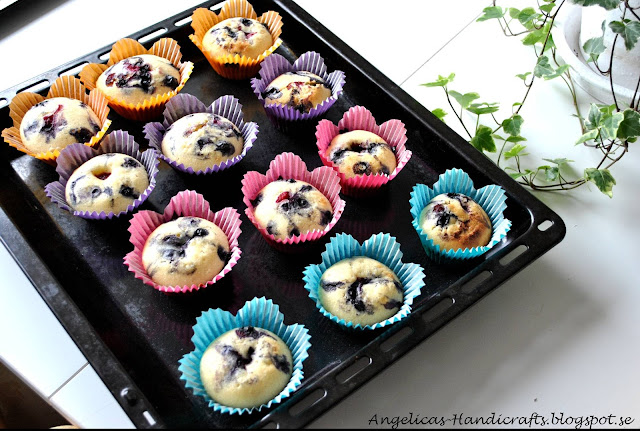
Raspberry and Blueberry Muffins

On a grey Monday afternoon a batch of lovely berry myffins can make the sun shine! 
I found this recipe in the golden "Swedish cakes and Cookies", a Swedish classic baking book. If you would like to buy this book you can find the swedish edition here and the english edition here!

Happy baking!


12 Raspberry and Blueberry Muffins
100 grams of margarine or butter
1 1/2 dl sugar
4 eggs
5 deciliter flour
1 teaspoon baking powder
1 teaspoon vanilla sugar powder
1 deciliter milk
1,5 deciliter frozen berries, I chose raspberry- and blueberry mix

How to...
1. Put the oven to 175 Celcius.
2. Stirr the room temperatured margarine with the sugar until you get a white and homogeneous mixture. 
3. Add one egg at the time and stirr carefully. 
4. Mix bakingpowder, vanilla sugar powder and flour in a bowl.
5. Alternate between adding flour mixture and milk to the margarin/sugar/egg mixture little by little while stirring carefully until you have the final smooth batter.
6. Distribute the batter into the paper baking cups.
7. Use your fingers or a spoon to poke down the berries deep into each cup with batter. Make sure to spread the berries.
8. Bake in the middle of the oven for 15-20 minutes.


Sunday, 23 August 2015

Tosca Cake

One of my grandmother's classic recipes was the tosca cake, a soft spunge cake with a layer of caramelized almonds on top. I remember as a child I found the topping was the goodiest thing so I ate that first :)
I haven't baked this cake before, and I haven't eaten one since my grandmother made it maybe ten years ago, so I experienced a flashback when I took a bite of this :) A good flashback! The almond topping is the best! Try it, you won't be disappointed :)
Tosca Cake
100 grams or magarine or butter
2 eggs
1 1/2 dl sugar
2 dm flour
1 teaspoon baking powder
1/2 deciliter milk

Topping
100 grams of margarine or butter
1 deciliter sugar
2 tablespoons flour
2 tablespoons milk
100 grams chopped sweet almonds (peeled or unpeeled)

1. Put oven to 175 Celsius.
2. Grease and bread a round cake tin with removable rim, aproximately 24 cm in diameter.
3. Melt the margarine/butter and let it cool for a while.
3. Whisk sugar and eggs until the mix is light and fluffy.
4. Add the flour mixed with baking powder, the melted margarine/butter and the milk until you get a smooth fluffy batter.
5. Pour the batter into the cake tin and let the cake bake in the lower part of the oven for about 20 minutes.
6. While the cake is in the oven you can start preparing the topping.
7. Mix all the ingredients into a saucepan and let it warm slowly while you stire carefully.
8. When the mixture has started to thicken it is ready.
9. Spread the topping on the cake.
10. Let the cake bake approximately 15 minutes more in the middle of the oven until the color is nice on the topping.


Saturday, 25 July 2015

Pizza Buns

Sometimes you just need something good for lunch, or for the picnic or just a snack that is more than just a sandwich. A great candidate for that mission is the pizza bun. It is simple to bake them and they are both delicious and fills the stomach good. Today I paired these lovely buns with a bowl of fresh water melon, pear and milk - a very tasty combination!
These buns are fast to bake and you don't even have to let them raise anytime before sending them into the oven. Perfect for those of you who think you may not have the time to bake.
I baked these with dryed yeast and therefore I used 40 degrees Celcius water in my recipe. If you use fresh yeast you should use maximum 37 degrees Celcius water.


Pizza Buns (~24 pieces)
Dough
50 grams of dryed yeast
2 1/2 deciliter 40 degrees Celcius water
1 teaspoon salt
3 tablespoons oil
420 grams of flour

Filling (here you can choose your favourite ingredients)
400 grams of crusched tomatoes
1 decilter chili sauce
1 tablespoon dryed oregano
400 grams of sliced ham
400 grams canned muschrooms
400 grams grated cheese

1. Put the oven to 250 Celcius.
2. Mix water, oil and salt into a bowl.
3. Mix the flour with the yeast and add the flour little by little to the water mixture.
4. Knead the dough for five minutes until it is smooth and easy to work with. If it is sticky, add flour carefully, you do not want the dough to get too much flour.
5. Roll out the dough to a rectangle, approximately 40 cm wide and 30 cm high.
6. Mix the crushed tomatoes with the chili sauce and spread all over the dough rectangle.
7. Add ham, muschrooms, oregano and cheese on top of the tomato mixture.
8. Finally, start rolling from the 40 cm side to the other 40 cm side until you get a nice big roll.
9. Slice the roll into 2 cm thick pieces and put them with the sliced side up into paper cups.
10. Bake in the middle of the oven for about 8-10 minutes.


Monday, 29 June 2015

Marbled Cake / Tiger Cake

Grrrr! Hello friends, this week I will show you a recipe for marbled cake, or as I have always called it, Tiger cake :) This classic cake is basically 1/3 chocolate batter and 2/3 vanilla flavoured batter, but you could of course use two other flavours if you want, I guess the variations can be unlimited :)


Marbled Cake / Tiger Cake Recipe
200 grams of butter or margarine
2 1/2 deciliter sugar
3 eggs
4 deciliter flour
1 teaspoon baking powder
1 deciliter milk

Flavours:
2 tablespoons cocoa powder
1 tablespon vanilla sugar (or 1/2-1 lemon zest)

Put oven to 175 Celsius.
Grease and bread a baking pan size about 1 1/2 liter.
Stirr the margarine and the sugar white and smooth and add one egg at the time while continuing stirring.
Mix flour and baking powder and add to the egg mixture along with the milk little by little to avoid lumbs.
Put 1/3 of the batter in a bowl and add the cocoa.
Flavour the rest of the batter with vanilla suger or lemon zest.
Pour half of the vanilla batter into the baking pan, and then pour the coca batter on top. Finally add the last of the vanilla batter on top of the cocoa batter.
Use a fork and draw it around through all the layers a few times so the layers mix into each other.
Bake in the lower part of the oven for about one hour.

Have a great week folks!


Saturday, 6 June 2015

Carrot Cupcakes with Cream Cheese Frosting

What would be better than celebrating Saturday with baking carrot cupcakes?! Well, I didn't have a good answer to that question so I stepped into my kitchen with happy feet and started making some :)

Beacause I personally think that frosting that contains only icing sugar and butter is a bit too sweet for my taste, I wanted to try this frosting because I have heard cream cheese frosting is not as sweet. However, I found that this frosting also is a way too sweet for my taste so for future cupcake baking I will spread my wings and do some serious digging on the Internet to find a frosting that is very fresh, creamy and not so sweet. 

This recipe is originally from Leilas homepage but I will also give it in English here in this post - YAY!
 Carrot Cupcakes
3 eggs
270 grams of sugar
180 grams of flour
1 teaspoon vanilla sugar
3 teaspoons baking powder
1 pinch of salt
1 1/2 teaspoons ground cinnamon
1 teaspoon ground cardamom
2 teaspoons ground ginger
150 ml sunflower oil
450 grams grated carrots
Cream Cheese Frosting
65 grams of soft butter
300 grams of icing sugar
1 teaspoon vanilla sugar
100 grams of cream cheese 
  1. Put the oven to 175 Celsius.
  2. Beat the eggs and the sugar until pale and fluffy.
  3. Mix the dry ingredients and turn into the egg mixture.
  4. Stirr in the oil and carrots.
  5. Put paper cases on a tin and pour in the mixture until the cases are two-thirds full.
  6. Bake in the centre of the oven for 12–15 minutes. Leave to cool.
  7. Make the frosting by mixing together the ingredients until creamy.
  8. Spread the frosting on top of the cupcakes.


Saturday, 11 April 2015

Vanilla Cupcakes with Blueberry Cream Cheese Frosting

When my husband and I had our birthday party my mother in law gave us a new kitchen machine - a cupcake maker! I didn't even knew they existed! My first thought was that this machine was one of all new inventions that would be great for two tries and then one would discover that the result gets better in the oven. Well, I was wrong, the result is very good! I will definately use it many times in the future :) The concept of this machine is to be able to make cupcakes easy and fast without oven and without all the oven plates and baking cups in paper or silicone. Well I used silicon cups anyway :)

The cupcake maker we got was bought at the store Clas Ohlson, a large retail chain in Sweden. The store has a English homepage and a Swedish homepage. The cupcake maker you find with the English link doesn't look exactly the same like mine but I am sure it is basically the same machine.

I started from a recipe from a little book called "Cupcakes" by Corinne Jausserand (but I made a few changes on the way). Together with this little book you also get 16 small silicone cups that you can use again and again. I use them when I bake and they fit very well in the cupcake maker :)


Vanilla Cupcakes with Blueberry Cream Cheese Frosting

Vanilla Cupcakes
1 3/4 deciliter flour
1 milliliter salt
1/2 teaspoon bicarbonate
1 deciliter sugar
100 grams room temperatured butter
2 teaspoons vanilla sugar
2 eggs

Put the oven on 175 Celsius (I turn on the cupcake maker and wait until the green indicator lamp light on the top goes out)
Mix flour, salt and bicarbonate into bowl number 1 and set it aside for now.
Put the sugar into bowl number 2 and add the butter in pieces.
Add the vanilla sugar into bowl number 2 and whip the butter, sugar and vanilla sugar with a electric mixer.
Crack the first egg into bowl number 2, whip, add the second egg and whip again until the it is all homogeneous.
Use a fine mech strainer to get the flourmix from bowl 1 very fine and add the flourmix to bowl number 2 while you are whipping with the electric mixer.
Whip the mixture in about 2-3 minutes until it is very smooth and fluffy.
Fill the cupcake silicone cups with the mixture using a spoon. Fill upp about 2/3 of the cups.
In an ordinary oven you let the cupcakes bake for about 15-20 minutes (depending on the size of the cupcakes), however if you use a cupcake maker like me the time is about 10 -11 minutes.
When the cupcakes are ready you let them rest and cool on a plate.

Blueberry Cream Cheese Frosting
100 grams of Cream Cheese (Philadelphia is one option)
1 deciliter icing sugar
2 tablespoons of blueberries (fresh or frozen)

Mix the blueberries and the sugar in a saucepan. Let the mixture simmer and crush the berries with a spoon. Let the mixture cool.
Stirr the cream cheese with a fork to get it smooth. 
Use a fine mesh strainer to get the icing sugar very fine and add it to the cream cheese. Stirr well.
Add the cooled blueberry mixture little by little into the cream cheese/icing sugar mix to get a 
Spread the frosting on your cupcakes with a knife or pipe it out as a swirl (but remember to have a big opening so the blueberry pieces in the frosting don't get stuck).




Saturday, 14 March 2015

Lemon Cake with Raspberry/Blueberry Jam and Vanilla Custard

HAPPY BIRTHDAY ANGELICA'S HANDICRAFTS - ONE YEAR HAS PAST!

Oh, I can't believe that the blog turns one year this weekend! It has been a wonderful year and I have blogged about many new projects. This year has made me realized that I actually can finish things and not just start them! As you probably have experienced this year I try to do different projects from week to week so you readers get variation. I hope you have enjoyed the past year's posts and keep coming back and always feel free to give me a comment :) As a birthday present for the blog I have started a Instagram profile today named angelicashandicrafts where I will start posting pictures of projects and other things regarding the blog - I hope we meet there!

For this week I made a birthday cake for my blog, I wanted to make it in many layers and I wanted to make all the parts by myself and not use any semi-manufactures.
The cake contains three layers of filling; two layers of homemade blueberry/raspberry jam and one layer of homemade vanilla custard.


Lemon Cake with Blueberry/Raspberry Jam and Vanilla Custard

Garnish
5 dl whipped cream
Red food coloring
Sprinkles

Homemade bluberry/raspberry jam
250 grams frozen raspberries
250 grams frozen blueberries
1 deciliter sugar
Sheet of gelatin (optional)

1. Let the berries thaw and become soft in a sauce pan on medium heat while stirring. 
2. When the berries are soft you can use a spoon or a masher to crush the berries.
3. Add sugar and let the jam simmer for about 15 minutes.
4. If you want you can add gelatin sheet, follow the instuctions on the package.
5. Put the jam into the fridge to cool completely.

Vanilla Custard
2 deciliter milk
2 tablespoons sugar
2 tablespoons corn starch
2 egg yolks
2 teaspoons vanilla sugar

1. Put all the ingrediets, except for the vanilla sugar, into a sauce pan.
2. Whisk until you get a smooth batter.
3. Heat on low to medium heat while you continue to whisk constantly until the custard is firm and fine in texture. The custarn must not boil!
4. Stir gentley and add the vanilla sugar.
5. Let the custard cool and keep it in he fridge until making the cake.

Lemon Cake (make TWO of this!)
3 eggs
2 deciliter sugar
1 deciliter wheat flour
60 grams potato flour
2 teaspoons baking powder
Juice and grated lemon zest of 1/2 lemon

1. Put the oven on 175 Celsius.
2. Grease and bread a spring form diameter 20 cm.
3. Whisk the eggs and sugar until the batter is light and white.
4. Mix flour, potatoflour and baking powder and then stirr it into the egg batter.
5. Add the lemon juce and the grated lemon zest into the batter. 
6. Pour the batter into the spring form and bake in the loer part of the oven for about 40 minutes (but use a test stick to see when it is dry.
7. Let the cake cool in the form and then take it out and let it rest on a grid.

Assembly the cake
1. If the two lemon cakes are rounded on top, even out with a knife. Cut both cakes in two so you get a total of four cake layers.
2. Put the first cake layer on a cake stad or a plate and spread half of the blueberry/raspberry jam on it.
3. Add the next cake layer and spread all of the vanilla custard on it.
4. Add the next cake layer and add the rest of the blueberry/raspberry jam on it.
5. Add the final cake layer.
6. Whip 5 the cream and add a few drops of red food coloring to make it pink.
7. Use a spatula to spread a layer of pink cream all over the cake.
8. Use a piping bag to make decorations on top and cover the cake with sprinkles!

Tip: I made the jam and the vanilla custard the day before I made the cake - good to divide the various stages and not do everything at once!


Monday, 16 February 2015

Semlor

So, my dear friends, it is time for the special day, Fettisdagen (Shrove Tuesday), tomorrow and of course I want to give you my recipe of these lovely pastries we eat like crazy here in Sweden this time of year: Cardamom wheat buns filled with almond paste and whipped cream!
The recipe for the buns is very easy, it takes quite some time to let the buns raise but they will be worth the wait! The filling is quickly managed, especially if you use ready almond paste from the store like I did. However, if you don't have the possibility to buy almond paste, I will give you a recipe for it in this post too.


Cardamom buns filled with whipped cream and almond paste

Buns
640 grams flour
112 grams sugar
112 grams room temperatured butter
15 grams powdered cardamom
3 grams salt
280 grams milk
1/2 egg
25 grams fresh yeast

Filling
Whipped cream 
Almond paste 

Almond Paste
This recipe gives 100 grams almond paste
75 grams of almonds
2 bitter almonds
3 deciliter icing sugar
1,5 tablespoon water

1. Boild the almonds and the bitter almonds in water a minute until the shells will begin to loosen.Rinse the almonds with cold water and remove the shells.
2. Dry the almonds.
3. Mix the almonds together with sugar in a food processor until you get a flour.
4. Add water and mix until it gets a smooth texture.


Garnish
Sieved icing sugar

1. Put all the ingredients in room temperature for a couple of hours before baking.
2. Use a baking machine and just put all the ingredients into the bowl without heating or sifting and led the machine work the dough for about 20 minutes on low speed. 
3. When the dough is ready you will be able to take a piece of dough between your hands and make a thin membrane that will not crack. If you are kneading my hand you will have to knead for about 40 minutes.
4. Without letting the dough raise you make buns (60 grams each) of it and put them on a baking tray. Make sure you give them space so they will not raise into eachother.
5. Boil water and put the pan with the water in the bottom of your cold oven. Put the trays with the buns. The water will evaporate and it will me warm and moist into the oven while the buns raise. Let the buns raise to double size, it took about 90 minutes for me.
6. Get the trays out of the oven and put the oven to 200 Celcius.
7. When the oven is heated, bake the buns for about 5 minutes until the buns have a nice golden color.
8. Let the buns cool on a grid.
9. Whip the cream until the texture is good enough to pipe it.
10. Mix the ready made almond paste with a spoon of water and use a fork to make the texture smooth.
11. Cut off the top of the buns so you get a little hat.
12. Put the almond paste on the cut surface and this is a matter of taste how much you want to put on.
13. Now it is time to pipe the cream on top of the almond paste. Try to cover on the sides som the almond paste doesn't show.
14. Put the little hat on top and sift powdered sugar over.


Saturday, 7 February 2015

Valentines Day Cinnamon Heart Buns

Next Saturday, the 14th of February, is the day you either hate or love - Valentine's Day. Regardless what kind you are, these buns I show you today will be the answer to a happy day in both cases. Even if we may be heartbroken, happily married or not interested in romance at the moment we all can find a reason to enjoy a coffee break (well, I prefer ice cold milk any day!) with cinnamon hearts.
I have always been quite disappointed in ordinary cinnamon buns because they are heavenly to eat freshly baked but gets dry and boring after a day or two. The main reason is that the filling I use to make is containing just sugar, cinnamon and a little bit of butter just prinkled on the dough before rolling it together. This time I made a new twist mixing butter, sugar, cinnamon AND almond paste! The result is mindblowing for me, the filling is sticky and delicious even after several days. I can assure you I will never go back to my old ways again!

Happy Valentine's Day people!


Cinnamon Heart Buns (approximately 15 buns)
600 grams flour
3 deciliter milk (room temperatured)
75 grams butter (room temperatured
1,5 deciliter sugar
25 grams fresh yeast (for sweet dough)
1 teaspoon cardamom

Filling
100 grams butter (room temperatured)
1 deciliter sugar
1,5 deciliter grated almond paste
2 tablespoons cinnamon

Decoration
1 egg
granulated sugar

1. Dissolve the yeast in the milk and then add sugar and cardamom.
2. Add 300 grams of flour little by little while stirring with a ladle or use a baking machine. If you use machine let it work for about 15 minutes.
3. Let the dough rise for about 30 minutes.
4. Keep on using the machine or and start working the dough while adding the rest of the flour and the butter in small pieces. You can also knead by hand if you feel more comfortable with that.
5. When the dough is nice and even without being sticky, let it rise for about 30 minutes.
6. Roll out the dough to a rectangle shape approximately 40*30 centimeter (40 cm horizontal) and about 0,5 cm thick.
7. Mix the room temperatured ingredients for the filling in a bowl and then spread it evenly all over the rectangel all the way out to the edges. 
8. Start rolling the two 40 cm edges into the middle of the rectangle and make sure the rolls are getting the same size when they meet.
9. Use a sharp knife to make 2 cm slices and lay the buns on a baking tray covered with baking paper. To get the heart shape you need to use the handle of a spoon sticking it right between the two rolls and drag the middle part down so you get the sharp lower edge of the heart. You can also use your thumb and forefinger to squeeze the rolls together a bit. Let the buns raise for about an hour under towel.
10. Put the oven on 225 Celcius.
11. Beat the egg and brush it on top and around all edges of the buns, sparkle the granulated sugar on top.
12. Bake in the middle of the oven for about 8-10 minutes until they get a nice golden brown color.


Monday, 2 February 2015

Apple and Cinnamon Muffin

This weekend I have had a terrible cold and while my nose was running and my head was hurting I wanted to make something easy and really tasty to bury my troubles in and I came up with the perfect treat - apple and cinnamon muffin!
I bought the lovely baking cups in a Swedish interior design shop called Lagerhaus, click here to see their offers on baking accessories!


Apple and Cinnamon Muffin
100 grams margarine or butter
1 1/2 dl sugar
4 eggs
5 deciliter flour
1 teaspoon baking powder
1 teaspoon vanilla powder
1 deciliter milk
2 peeled apples in small pieces
1 tablespoon cinnamon
2 tablespoons sugar

Put your oven to 200 Celcius.
Work margarine and sugar together well in a bowl.
Add one egg at the time while you stirring vigorously.
Mix flour, vanilla powder and baking powder.
Pour the mixture into the egg/margarine/sugar batter and then add milk little by little.
Make sure to stirr until the batter is homogeneous and without lumps.
Use two tablespoons to distribute the mix into paper cups.
Poke down the apple pieces into the batter and sprinkle a mixture of sugar and cinnamon on top.
Bake in the middle of the oven for 15 minues.