Monday, 30 November 2015

Soft Pink Teddy Bear

It is teddy bear time!
As I was browsing trough my patterns I found this very cute teddy bear, and since I got a lot of fur fabric in different colors from my husband for my birthday I finally found what I was going to do with it (beacuse I wanted to make something really nice). For this bear I chose a pale pink fur fabric and since the fabric was about 1,5 m long I only used about 30 cm width! That means that I have almost 1,5 meter width left ready to be used for something else.
The whole body is one piece, the only separate pieces are the nose and the ears which I have sewn by hand. The instructions were not easy to follow when it came to the nose area since the pictures were very dark and authors used dark brown fabric. In the end I just got a bit frustrated and I made some own decisions and it came out good. I usually is quite impatient with patterns and if I don't understand right away I just do my own thing and hope for the best. However, this time I really pushed myself to understand for a long time but it didn't work out. I think the result is good and I will stick to my own routines if I do more bears of this model. The pattern I found for this bear is coming from the same book I used for the Soft Toy Elephant.

Happy sewing everyone!


Monday, 23 November 2015

Purple Knitted Mittens

In Sweden we are starting to get closer to winter time, and this morning we had -11 degrees Celsius. It is the perfect time to curl up in the armchair under a cozy warm blanket and knit mittens.
This model is borrowed from Drops Design Studio's homepage and you can choose your language in the menu at the right under the picture in the pattern.

If the thought of making your own mittens have crossed your mind once or twice my advise is "Go for it!", because it really is easy once you understand the pattern instructions and it really feels great to put the finished mittens on your hands and be able to say "I made these" to all of your friends and family :) Maybe you even surprise someone with a great homemade christmas gift <3

Since I always do "my own thing" with patterns I find, I just made stocking stitch for these mittens and used two purple colors to lighten things up a bit. I really like the type of ending in the top, it turned out very good. I hope my friend feels warm this winter when she gets this gift :)
Happy knitting everyone!


Saturday, 7 November 2015

Ink Drawing Susy

As I told you in the post when I draw my sister in law Liselotte I have really started to like the ink pencils I bought some time ago. This drawing of my friend Susy took about six hours which is quite long time but I was really satisfied with the result. This time I tried to use the light colors more and be careful with the dark brown color in the hair. I think I nailed her eyes and those are very important to make it look like her, so I think this one turned out pretty great. 
I start with a light lead pencil to make all the details and then I use the ink to fill it with color. It is fun but a little scary to use ink because you can easily make a mistake and then it is hard to fix it. 


Saturday, 31 October 2015

Knitted Orange and Brown Wrist Warmers

I am very into knitting right now, probably since I got large amounts of yarns for my birthday but also because it is getting colder and soon it will be winter here in Sweden. I found a very nice and simple pattern for these wrist warmers on Drops Design Studio homepage, and you can easily change the language right under the picture to the left in the pattern :)

I will definately save this pattern for the future because it is great for both wrist warmers and ordinary mittens. The thumb increase is easy to understand and the only thing you do differently to use it as a pattern for mittens you don't bind off the stitches for the thumb, just saving them on a piece of yarn for later to make the thumb.

Happy knitting! :)


Monday, 26 October 2015

Ink Drawing Liselotte

The last couple of days I have had thoughts of starting to draw pictures agian. I really love drawing, especially human faces because of all the opportunities faces give, and I looked into my boxes with pencils and other drawing eqipment I have. I bought some Indian ink pencils in beige and brown colors a year ago but somehow I never used them. Today I used them for the veryfirst time and this drawing is my first attempt to make a Indian ink drawing. I made the first contours with ordinary lead pencils and then I just used my feelingshow it should be and colored as I went.

The girl in the picture is my sister in law Liselotte. She has a very unique face with strong details so it was fun to try to make the drawing look like her. I think I nailed some parts but for next time I will try to dare more with the colors around the cheeks and the nose because then I think the similarities with the original will be better :) I am really overwhelmed with these ink pencils and I will keep on using them in the future. For this drawing I only used four pencils: one black marker, and three ink pencils in light sand, dark beige and brown. I will buy some new colors, maybe some grey colors and white to get more possibilities. 


Monday, 19 October 2015

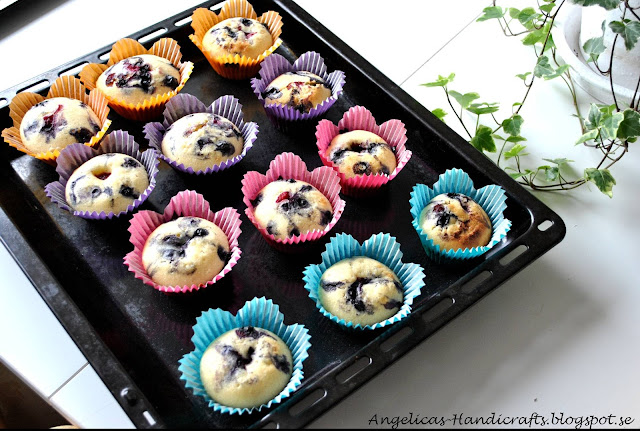
Raspberry and Blueberry Muffins

On a grey Monday afternoon a batch of lovely berry myffins can make the sun shine! 
I found this recipe in the golden "Swedish cakes and Cookies", a Swedish classic baking book. If you would like to buy this book you can find the swedish edition here and the english edition here!

Happy baking!


12 Raspberry and Blueberry Muffins
100 grams of margarine or butter
1 1/2 dl sugar
4 eggs
5 deciliter flour
1 teaspoon baking powder
1 teaspoon vanilla sugar powder
1 deciliter milk
1,5 deciliter frozen berries, I chose raspberry- and blueberry mix

How to...
1. Put the oven to 175 Celcius.
2. Stirr the room temperatured margarine with the sugar until you get a white and homogeneous mixture. 
3. Add one egg at the time and stirr carefully. 
4. Mix bakingpowder, vanilla sugar powder and flour in a bowl.
5. Alternate between adding flour mixture and milk to the margarin/sugar/egg mixture little by little while stirring carefully until you have the final smooth batter.
6. Distribute the batter into the paper baking cups.
7. Use your fingers or a spoon to poke down the berries deep into each cup with batter. Make sure to spread the berries.
8. Bake in the middle of the oven for 15-20 minutes.


Tuesday, 13 October 2015

Blue Knitted Mittens

I took a glance into my basket of yarns and found some unfinished business. A half-finished sad little mitten was hanging around with the yarn balls thinking about if it ever would be a real mitten someday. Actually that mitten has been laying around ever since last winter when I thought it would be nice to knit mittens for my husband for Chrismas. However, I had too little time back then and I decided to give him something else.
Well now the half-finished mitten is finished and so is his brother :)

I combined two patterns for these mittens and that is because I started making a model were every finger is individual but I found that it was too hard for me so I found a pattern with only the individual thumb. Here is the free pattern for mittens with individual fingers and here you find the free pattern for the mittens with only individual thumb.

The yarn I used is acrylic and it has its positive and negative features for sure. The positive features are the strong bright colors that is not very common in cotton yarns or wool, at least not where I live. The negative features are that the garment you make will almost always get uneven on the knitted surface unlike wool or cotton who will stay firm amd smooth.


Sunday, 4 October 2015

Crocheted Wrist Warmers

This weekend I found some really cute wrist warmers to make in the sofa while watching television. I was looking for a easy project and something I could really use.
I am a true beginner when it comes to crocheting so I was very pleased when I found this video tutorial for these wrist warmers on Drops Design Studio's homepage. The video is really easy to follow (no sound, only visual) and you work with both the video and the free pattern at he same time. When you get the hang on the pattern routine you don't have to look so much in the pattern description and it turns out quite fun when the fingers just go with the flow :) Oh, and you can change the pattern language in the menu just below the picture!

Since I had these yarns I really wanted to use (because I love how they shine in the sunlight) the thickness of the yarns doesn't match the thickness recomended in the pattern and the final result of the hand warmers is not very graceful and smooth like the pictures in the pattern. However, I don't really mind, I think that the colors turns the roughness to look quite charming so I am proud to put them on anyway :)

This type of garment is not ideal for my own use because my fingers gets very cold easily. These wrist warmers cover basically the whole hand except the fingers so if it is a bit cold outside it is better for me to use knitted gloves. These wrist warmers will however be good to use between autumn and winter when it is not too warm but not too cold either.   


Wednesday, 2 September 2015

Soft Toy Elephant

As you probably already know by now I like making toys and last month when I found a book about making soft toys I knew I had to start planning for some serious toy making! The book is from the 70's but these models doesn't get out of fashion which is great.

The pattern pieces for these toys were drawn in miniature size on squared paper in the book and I had to do my own squared paper were each square was 2,5 cm *2,5 cm to get the natural size. Then I tried to copy the drawings of all pattern pieces the best I could on my own natural sized squared paper.
It was a new way for me to get the pattern ready, I have only used Burda patterns before and there you don't have to re-size anything or draw by hand, so this was exciting and fun!

I chose the elephant pattern because I thought it was so very cute. I calculated how big the final toy would be and thought it might get too big so I chose to make my squares 1,5 cm instead of 2,5 cm. That resulted in the little elephant you see in the pictures. It was a little tricky to sew and then turn the fabric inside out, especially around the trunk area, so I decided to make one more elephant in the original size which resulted in the big elephant in the pictures. I think they both turned out good and I am pleased with them both. The filling is a white fluffy 100% polyester fuzz, but according to the book small pieces of cloths is good to use too.


Sunday, 23 August 2015

Tosca Cake

One of my grandmother's classic recipes was the tosca cake, a soft spunge cake with a layer of caramelized almonds on top. I remember as a child I found the topping was the goodiest thing so I ate that first :)
I haven't baked this cake before, and I haven't eaten one since my grandmother made it maybe ten years ago, so I experienced a flashback when I took a bite of this :) A good flashback! The almond topping is the best! Try it, you won't be disappointed :)
Tosca Cake
100 grams or magarine or butter
2 eggs
1 1/2 dl sugar
2 dm flour
1 teaspoon baking powder
1/2 deciliter milk

Topping
100 grams of margarine or butter
1 deciliter sugar
2 tablespoons flour
2 tablespoons milk
100 grams chopped sweet almonds (peeled or unpeeled)

1. Put oven to 175 Celsius.
2. Grease and bread a round cake tin with removable rim, aproximately 24 cm in diameter.
3. Melt the margarine/butter and let it cool for a while.
3. Whisk sugar and eggs until the mix is light and fluffy.
4. Add the flour mixed with baking powder, the melted margarine/butter and the milk until you get a smooth fluffy batter.
5. Pour the batter into the cake tin and let the cake bake in the lower part of the oven for about 20 minutes.
6. While the cake is in the oven you can start preparing the topping.
7. Mix all the ingredients into a saucepan and let it warm slowly while you stire carefully.
8. When the mixture has started to thicken it is ready.
9. Spread the topping on the cake.
10. Let the cake bake approximately 15 minutes more in the middle of the oven until the color is nice on the topping.


Saturday, 15 August 2015

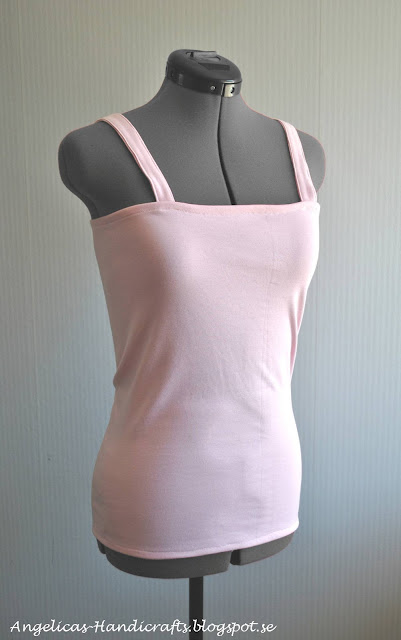
Simple Jersey Tank Top!

Hello! I took a little summer vacation the past two weeks and I am now back on the blog with a very simple and cute sewing idea! Tank tops are one of the most popular garments but even if they often are made of very small amount of fabric they cost quite much. Also, I have the problem that when I need a tank top I seem to be the only one looking for COLOUR because the shops are always full of black, white and grey garments... So, I thought to myself that I probably need to fix the tank top I want by myself. I went to my favourite store in my town, Ohlssons Tyger, and found some lovely jersey fabric. The fabric was actually knitted like a tube and had the perfect diameter for my body so this tank top model didn't need very much sewing!
I bought the fabric in the three colors light pink, yellow and purple so I could make three tank tops. The final cost for these three tank tops is about 160 Swedish crowns (20 USD) together and when I look in the stores I can't find three tank tops in the right colors for less than 300 Swedish crowns (35 USD) together so I think I made a good deal :)

How to...
The easiest way to make your own tank top is to take measurements from a tank top you already have and like. Measure the body length and width of the tank top and then transfer them to the new fabric you want to use. If you don't have a tube-knitted fabric like I had, just cut out two rectangles in single sided fabric and sew one seam in each side to make your own "tube".  Remember to add about 0,5 cm on each side as seam allowance before you cut out your rectangles. Make sure to get the rib vertical so the fabric works along your body.

I wanted my tank top to be 45 cm long so I cut it about 50 cm and fold the upper and the lower edges about 2,5 cm each to get the final 45 cm length. The two stripes you see at the right in the picture above, are the two shoulder-straps in double fabric. You can of course make them how wide you like but I made them 3 cm wide and fold the long edges in about 0,5 cm on each side so they became about 2 cm wide in the end.
To get the right length for the shoulder-straps I measured on a tank top I had at home, you can also measure the straps on your bra. 

The piece in the lower part of the picture I used to make a headband to match with the tank top - super cute!

Saturday, 25 July 2015

Pizza Buns

Sometimes you just need something good for lunch, or for the picnic or just a snack that is more than just a sandwich. A great candidate for that mission is the pizza bun. It is simple to bake them and they are both delicious and fills the stomach good. Today I paired these lovely buns with a bowl of fresh water melon, pear and milk - a very tasty combination!
These buns are fast to bake and you don't even have to let them raise anytime before sending them into the oven. Perfect for those of you who think you may not have the time to bake.
I baked these with dryed yeast and therefore I used 40 degrees Celcius water in my recipe. If you use fresh yeast you should use maximum 37 degrees Celcius water.


Pizza Buns (~24 pieces)
Dough
50 grams of dryed yeast
2 1/2 deciliter 40 degrees Celcius water
1 teaspoon salt
3 tablespoons oil
420 grams of flour

Filling (here you can choose your favourite ingredients)
400 grams of crusched tomatoes
1 decilter chili sauce
1 tablespoon dryed oregano
400 grams of sliced ham
400 grams canned muschrooms
400 grams grated cheese

1. Put the oven to 250 Celcius.
2. Mix water, oil and salt into a bowl.
3. Mix the flour with the yeast and add the flour little by little to the water mixture.
4. Knead the dough for five minutes until it is smooth and easy to work with. If it is sticky, add flour carefully, you do not want the dough to get too much flour.
5. Roll out the dough to a rectangle, approximately 40 cm wide and 30 cm high.
6. Mix the crushed tomatoes with the chili sauce and spread all over the dough rectangle.
7. Add ham, muschrooms, oregano and cheese on top of the tomato mixture.
8. Finally, start rolling from the 40 cm side to the other 40 cm side until you get a nice big roll.
9. Slice the roll into 2 cm thick pieces and put them with the sliced side up into paper cups.
10. Bake in the middle of the oven for about 8-10 minutes.


Monday, 13 July 2015

Pink and White Plaid Kilt

For some time now I have had a pink and white plaided fabric I think is very pretty but I didn't know what to make out of it... until last weekend!
When I was in high school (no, we will not think about how many years has past since then...!) I wanted to have my own unique style and luckily I have a mother who is very talented seamstress. One type of garment that became my special feature was all my different kilts I had. When I count in my head how many different kilts I had (I still have them stored in a box somewere) I count to six and all of them were different from eachother in both length and style. I have thought about them now and then but last weekend I decided to try to make one myself. I studied one of my old kilts and tried to make a copy. My old kilt had about 3 cm deep pleats but I decided to make 5 cm deep pleats instead.
I am very pleased with the result and I was actually surprised that I could make it look so good and alike my mothers old kilt model.
I lined the kilt with a thin polyester fabric because when the kilt is so short it has the bad habit of "climbing" up the legs when I walk. I love this style and I will definately make several more kilts in the future. I think it could be my special feature again, I forgot how comfortable this garment is :)


Monday, 29 June 2015

Marbled Cake / Tiger Cake

Grrrr! Hello friends, this week I will show you a recipe for marbled cake, or as I have always called it, Tiger cake :) This classic cake is basically 1/3 chocolate batter and 2/3 vanilla flavoured batter, but you could of course use two other flavours if you want, I guess the variations can be unlimited :)


Marbled Cake / Tiger Cake Recipe
200 grams of butter or margarine
2 1/2 deciliter sugar
3 eggs
4 deciliter flour
1 teaspoon baking powder
1 deciliter milk

Flavours:
2 tablespoons cocoa powder
1 tablespon vanilla sugar (or 1/2-1 lemon zest)

Put oven to 175 Celsius.
Grease and bread a baking pan size about 1 1/2 liter.
Stirr the margarine and the sugar white and smooth and add one egg at the time while continuing stirring.
Mix flour and baking powder and add to the egg mixture along with the milk little by little to avoid lumbs.
Put 1/3 of the batter in a bowl and add the cocoa.
Flavour the rest of the batter with vanilla suger or lemon zest.
Pour half of the vanilla batter into the baking pan, and then pour the coca batter on top. Finally add the last of the vanilla batter on top of the cocoa batter.
Use a fork and draw it around through all the layers a few times so the layers mix into each other.
Bake in the lower part of the oven for about one hour.

Have a great week folks!